Soil Analysis

The purpose of this investigation is to try to figure out if our soil matches the crime scene soil in where Mr. Caters bike had been stolen. We were told that Mr.Caters bike had been stolen in AISD property. He had left his bike behind for a while and then he soon found out his bike had been stolen. When Mr. Cater looked around for his bike he found a foot print in the soil next to where his bike had been stolen. We took the soil from the footprint to try to see if it would match the soil we tested out earlier. The soil that I had collected earlier before the crime had been 100% sand. It had only of layer of pure sand. The soil I collected had a pH of 7. In order for the soil I collected and the soil from the crime to match they both have to be 100% and have a pH of 7.

Soil can be very useful and helpful in forensics investigations. In forensic investigations you deal with many crimes, and your goal is to gather as much information as possible to help figure out the crime. Collecting soil can identify location in where the crime had been located. For example if a dead body is found in a trash can and the body has some soil around and the body you can gather that soil and test it out for evidence. Testing out the soil can help identify where the body was located before it was put in the trash can. And then that will lead to more evidence. The 4 major soil categories are silt, clay, sand, and loam whenever they are all mixed together. To help identify the soil you’ll have test it.

  1. Gather the soil and make sure you break it into small pieces
  2. Put it in a test tube
  3. Add water to the test tube three-quarters full
  4. Add a small amount of non-foaming dishwasher soap
  5. Put in a tight fitting lid and shake hard for 10 to 15 minutes. The shaking will break apart the soil and it will separate the soil into individual mineral particles.

CHEMICAL TEST- The chemical test that we performed helped us find the pH of the soils collected. The pH of a soils can help determine if a plant will grow and survive. Whether certain minerals and nutrients are available to a plant is partly determined by the soils pH. If the pH of the soil is above 5.5, nitrogen in the soil is made available to plants. Phosphorus in the soil is available to plants when soil pH is between 6 and 7. The pH of the soil that I collected had a pH of 7 and the soils from the crime scene had a pH of 8.

Photo on the left side is the soil from the crime scene and photo from the right side is soil that I collect in the school. The crime scene soil shows a deeper color in the layers, and the soil I collected has a light more obvious layer. The pH was a slight bit darker green in the crime scene soil and the soil I collected was a bit lighter green. Both of this soils are different.

The soils don’t match. The soil I collected was pure 100% sand while the crime scene soil is not. The pH for the crime scene was a bit darker, it showed a pH of 8. While the pH of the soil I collected was lighter it showed a pH of 7.

The soils do not match. The location of my soil is not the location in where the footprint was found. I learned that testing out the soils is important and very helpful for forensics investigators.

QUESTIONS- Other than soil can plants be used too? Does the weather affect the soils in forensics investigations for example it the location of the soil is cold?

Next step to help us in this investigation is to test more soils from the other groups to see which soils match the best.

PRESIDENT & VP FOUND DEAD

The President and Vice President were reported dead. Now the question is who did it and why? The President and Vice President were having an argument, the usual. They both had trouble working together, different views and beliefs. Working with your friends can be difficult. They were having a private presidential meeting together along with the President’s Secretary. They were discussing economic issues and they both had different views in how to solve it. The meeting got out of hand. Brutal words were being said and each other to the point where they were throwing fist. The Vice President was getting very violent with the President. The Secretary freaked out and pulled out a hand gun and shot the Vice President in his left arm. The President couldn’t believe his eyes. He knew this news couldn’t come out or his reputation. The Vice President was still alive, the President freaked and shot the Vice President 3 times. He quickly exited the lunch room and made himself out to the court yard of the hotel. When he was walking out gunshots were being fired from above. The Vice president was still alive, he went out to the window and shot the President from above. The Vice President shot the President on top of his head. As the President collapsed to the ground the Vice President makes another shot in his left arm. After that they were both reported dead.

Evidence 

EYEWITNESS TESTIMONY-

Vicky- “I heard lots of gunshots close together coming from around the corner in the lunch room of the hotel.” This testimony shows that gun shots were being fired from a close distance. The President and Secretary were near the Vice President when they shot him.

Vlad “Secretary”- “We had just met with the Vice President in the lunch room of the Hotel De Blue and were walking west. I heard loud gunshots that hit the President in the head. He fell in the ground a few feet in front of me. I immediately ran the other direction back toward the train.” This testimony shows that the Secretary and President were in the lunch room with the Vice President. She ran away after the president was shot because she was afraid that she would get in serious trouble and hold for questioning.

Jeff- “I heard gunshots coming from above. Glass from the hotel window was falling. The President was dead face down.” This testimony shows that the gunshots came from the Hotel where the Vice President was located all the way down to the courtyard where the President was located.

WEAPON-

The President was shot with a Rifle and the Vice President was shot with a hand gun. 7 bullets were found in total. 3 that were shot in the vice presidents chest, 1 that hit the vice presidents left arm,and 1 that was missed (Hand Gun). The other 2 bullets were shot in the presidents head and left arm (Rifle).


Crimescene Hypothesis

The President and Vice President were both located in the lunch room. They had an argument because they couldn’t seem to work together any longer. The President out of anger shot the Vice President 4 times. 3 in his chest and 1 in his left arm. He quickly exited the building and was able to make him self out of the hotel. He was walking out towards the pond in till the Vice President from from the building shot down to where the President was located. He shot him in his head and then as he collapsed to the grown he was shot in his left arm. After a while they were both reported to be dead.

Fingerprints

Fingerprints are a lot harder to understand then you think. It is a great source of evidence because it points straight to one person. Every one has there own unique fingerprint. Fingerprints are formed in the mothers womb by the pressure and touch being caused. There are three different types of fingerprints, a loop, a whorl, and an arch fingerprint. Fingerprints carry so much detail in them, and that is what makes them all different and unique. Fingerprints are used and found in crime scenes. Patent is when the print is clearly visible because it has been left behind with something like blood or ink. Latent is when the print is not clearly visible until applying powders or some over method. And the last one is plastic, where the print is in 3 dimensions ans left in a soft material such as clay, soup, or putty.

The “Tent Card” was a very interesting process. It was interesting discovering what type of fingerprints I have. Many of the fingerprints look like they could be similar but if you look closely at the minutia we all have our unique details in our fingerprints. I found my left thumb fingerprint very unique, the detail of the loops looked interesting.

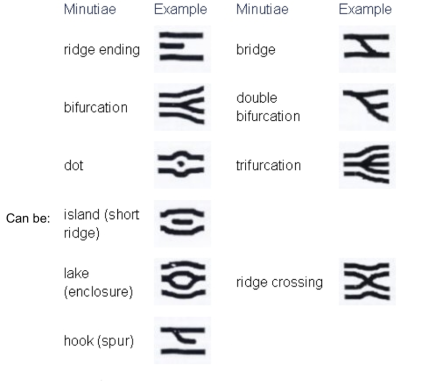
Minutiae are the small details that are in your fingerprint. There are 10 different types of minutiaes, for example an ending ridge, fork, island ridge, dot, bridge, spur, eye, double bifurcation, delta and a trifurcation.9133951_orig

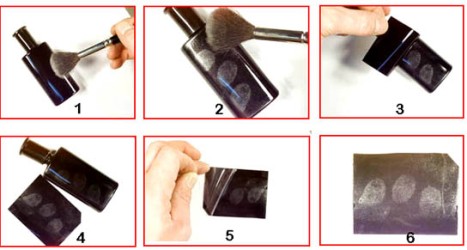
Lifting a fingerprint is a very difficult process. It seems like a easy process but I struggled a lot trying to lift a fingerprint out of a test tube. We found the fingerprint through latent. The print was not clearly visible in till we used the powder. We practiced lifting fingerprints off from a test tube using black powder. Using the powder was a bit tricky, you had to make sure you used enough for the print to be visible but not too much or the print will be smudge and ruined. After applying the powder we used tape to put it in the print, after that we lifted the print and added it to a piece of paper to make it look more visible. It took a good amount of tries to lift a perfect print. 1

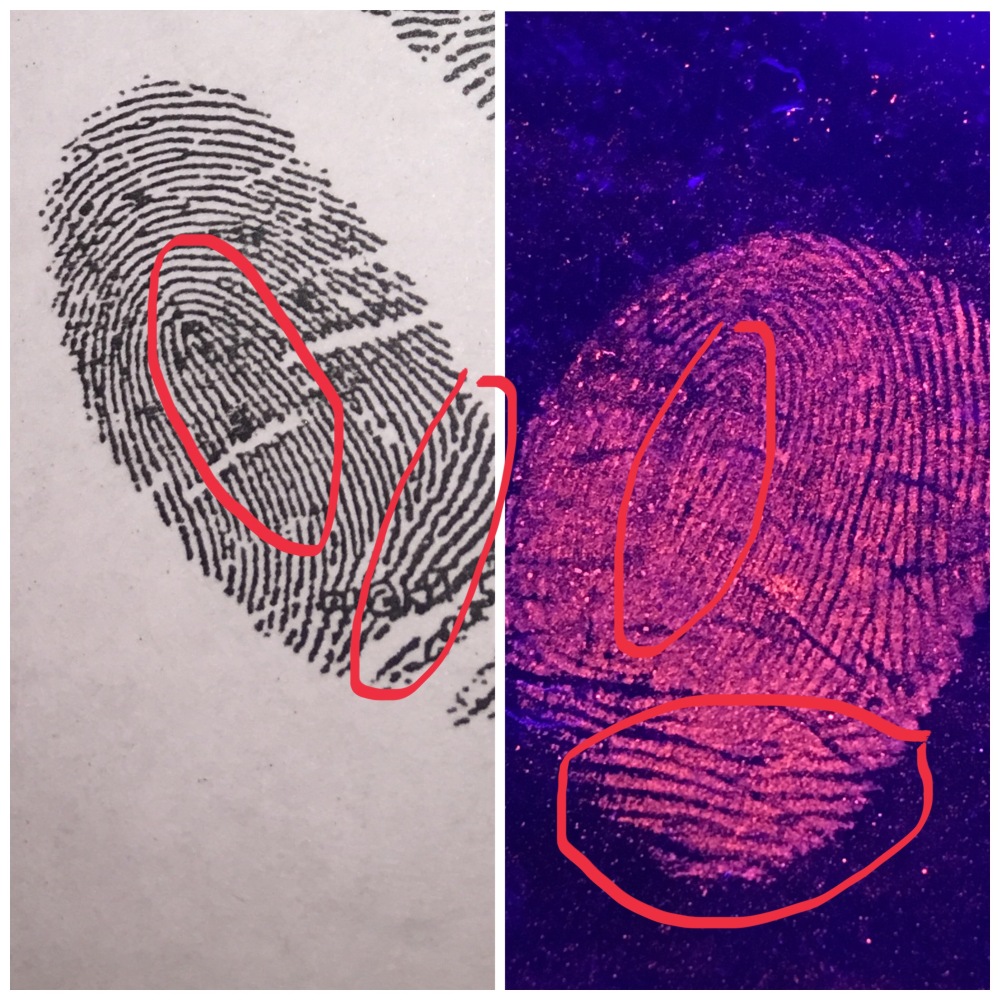
Phase 5-6: We received a empty jar with stolen candy filled with prints all around it. In order to find the criminal that stole the candy we would need to match the prints in the jar to the prints of the suspects. We used fluorescent powder in our prints. It was a bright pinkish powder, we applied it in our jar and found a good amount of prints. It was difficult for us to lift a perfect print. But after we lifted a good print we placed it into a black paper. We went into a black room and used a black light to be able to see the print with good detail. After a good look at our prints we went though the prints of the suspects to try to match them. The left index finger quickly stood out to us. Jeremy Rubios prints matched the prints found in the candy jar. They both had  the similar pattern of a loop in the left side of the print.

1486417759411


DNA. Three letters that identify who you are. Deoxyribose, Nucleic, Acid, also including phospate and four bases, guanine, cytosine, thymine, and adenine. DNA carries hereditary information. Your DNA makes you who you are. In forensics DNA is a type of evidence that can help identify you as guilty or innocent. The key to analyzing DNA evidence lies in comparison of genetic material found at a criminal scene with a suspect’s DNA in those segments that differ.

DNA is the king of evidence. DNA has brought many people to justice. You’d be surprised how many people get wrongly accused of a crime. In Texas Monthly an article “The Exonerated 37” talked about situations like this. 37 men spent years/decades in jail cells being wrongly accused for a crime they did not commit. “Each was convicted of doing something he did not do”. Many of the men were accused of rape. “Almost every man here had a solid alibi, but cops, prosecutors, and juries chose not to believe it.” But thankfully after years  later these 37 men found justice through DNA. DNA exams proved the innocent of these men. Without the DNA exams these man would most likely still be in jail.

However some may say DNA is not the king of evidence. Many people like to believe that eye witnesses are the kings of evidence, and that it’s reliable and trustworthy. Eyewitness are provided by a person who “clearly” observed the event/crime. It arises from the memory of the witness. Many of the times eyewitnesses can’t be reliable. The eye lies. People lie in what the claim to see. “The recent development of DNA evidence has shown quite ambiguously that innocent people often convicted of crimes.” So as you see DNA is 100% the way to go if you want to prove your innocence and justice.

The purpose of my paper is prove to you that DNA is the king of evidence. DNA will prove your innocence and is 100% the reliable way to go. Unlike eyewitnesses DNA is a proven evidence.

Forensics Entomology

Forensic entomology is the study of insects as they pertain to a legal situation. Typically, this means using insects as evidence of the post-mortem interval (PMI) for a body found during a criminal investigation.

The goal of this summative assessment is to evaluate whether our textbook accurately describes the life cycle of a blow fly. To do this, we must determine how long it takes for a blow fly egg to mature to an adult fly. We will then compare our results to the claims made by the textbook.

  • …how can insects can be used to estimate the post-mortem interval?

Insects are drawn to dead bodies. The insects will lay their eggs where food is for the eggs to access it.

  • …which types of insects are used in forensic entomology?

Flies is the main type of insect found in forensic entomology, but beetles and ants can also be found.

  • …what stages of life will a blow fly go through? (include a picture of the life cycle)

First the fly will l

ay their eggs. The eggs will grow and hatch. The eggs will turn to a larva. The larva will grow a black mouth and will actively eat. Then the larva will grow and its mouth will hook and not be visible. Then the larva will migrate away from body to a dry area (Pre-Pupa). The Larva the will turn dark brown with helped age filled air to help it split open, the Pupa will turn to an adult emerging. After all that process the Larva will finally turn into an adult fly, and the cycle will start all over with that fly.

  • …how reliable is forensic entomology?

Forensic entomology is just as reliable and unreliable as any other evidence. It’s still an early study, that being said scientist do not know 100 percent about forensic entomology and its reliability. However in my opinion forensic entomology is reliable because if the eggs are being put in the body then the eggs must stay there and grow, they won’t move away from where the food is unless they are physically moved. But also forensic entomology can’t happen during the winter.

  • …how long does the book claim that each stage of life will last?

The book claims that each stage will last about 1-4 days and the finally result will last 21-24 days.

  • …do you think that the flies in our experiment will go through their life cycle at the same rate as the textbook? Or do you they will mature more quickly? Or more slowly? (this is your hypothesis)

I predict that the flies in our experiillment will develop the life cycle quicker than it says it will in the textbook. The textbook says it will develop in 21-24 days into a fly, i however think it will turn to a fly faster than the book claims it will. I predict the will develop quicker because the flies will have a lot of access to our chicken.

  • …provide reasoning for why you chose that hypothesis.

I am sure that i will be my larva turn into an adult fly. They have a lot of access to our chicken, and are larvas won’t be bothered by anything. Our larvas will eat a lot with all the access they have to food that will cause them to go through the cycle a lot faster then the textbook says it would.

  • …flies will continue to enter the container and lay new eggs. How will you account for this?

ill take the eggs that were earliest put in the chicken.

  • …measure and record the length of at least two specimens each day. Explain how you took the measurements – what was your methodology? What equipment did you use?

Our first measurement on day 5 the larva was 13 mm, on day 7 the larva had grow to 16 mm, on the 9th day the larva turn to a pupa and it was 10 mm long, the 14th day the fly was released. Throughout the days the Larva ate a lot and grew bigger and bigger. But when it turned to a pupa in turned smaller.

The whole life cycle of a blow fly lasted about 14 days. And in the text book it claimed that the blow fly cycle would last 21-24 days. My hypothesis was correct, my hypothesis was that the cycle would develop quicker and faster.

What I learned from this experiment was the cycle of a blow fly. I learned how blow flies are able to be used as evidence to show how long a body has been dead.

Weather-The weather was all sunny, somewhat cloudy. However in day 7-9 there was a bit  of humidity/ rain, but nothing major that effect the chicken.


Image result for forensic entomology chart

My Dead Wife-summitive short story

There lies my wife, my beautiful dead wife. There was blood everywhere, all over her and around her. Stabs on her chest is what caused so much blood. Her  white shirt was on the floor next to her, it must have been ripped off during the murder when the stabs were occurring. The knife was in fact found at our house by following the footprints of blood by the killer. I was in shock, scared and confused of how this could have happened. Then I remembered we had just put up cameras at our home. We watched the video and saw the whole thing happen. My poor wife was murdered. 

Eyewitness Testimony Reflection

Our eyewitness testimony video was a gift wrap exchange. We had the viewers count how many times the gifts got passed to girl in the striped shirt. That being said the focus of the viewers would directly go to the girl in the striped shirt. That would cause them to possibly miss the changes that were happening around her. The perpose of this video is to show that eyewitnesses can’t always be reliable. A lot of the times they completely miss what is happening around them because they try to focuse on the main thing and that causes them to leave out details.

Reflection- This project was fun yet very difficult to make. Our group did a well job in coming up with a unique idea. We had fun recording but major issues editing the video. More class time was definitely needed. A tutorial on how to edit a video could have also been very helpful. Overall we worked good together. Editing the video and having it done in time was our only major issue.